The adoption of abstract syntax trees in JavaScript has led to an explosion in tooling that has changed the landscape for developers. The usage of ASTs allows JavaScript developers to better identify potential bugs before executing their code, as well as ensuring a consistent code quality across a codebase. Their use in build tools has changed how we write our JavaScript applications by not only letting us target future specifications of the JavaScript language but also to compile non-spec compliant syntax (e.g. JSX) to JavaScript for use in the browser. And by leveraging this data structure, developers can have 100% confidence in updating thousands of JavaScript files using an AST-based script by leveraging codemods.
While these tools carry a ton of power and potential, the use of code modification via AST manipulation scares off many developers. The name itself will cause your average developer to scratch his head and proclaim, “Well, I’m not a Computer Science major so I don’t think a tool like that is for me.” However, given the current tooling available, AST manipulation is very approachable.
In this post, I’d like to share some insight into how to leverage AST manipulation to your benefit as a developer. We’ll look at a couple tools that visualize JavaScript code as an AST as well as allow for real-time editing of code using JavaScript. We’ll also look at ESLint and how to write custom rules specific to your domain problem or team and how easy it is to apply to a project. And finally, we’ll look at writing a Babel plugin and how to leverage Babel as a codemod tool to apply changes to a codebase. The main focus of these examples is not only to show you how to write linting rules and Babel transforms but also how to setup an environment to develop and test them.
Sidenote: the inspiration for this post comes from Kent C. Dodds‘s Frontend Masters’ workshop on ASTs. I highly recommend his workshop if you’re brand new to language manipulation/analysis as well as all of his workshops in general.
Visualizing JavaScript Code
The first tool we’ll look at when working with ASTs is undeniably the most important and useful: ASTexplorer.net. This tool allows us to edit arbitrary JavaScript and it will generate an AST representation in real-time. AST Explorer includes various JavaScript parsers, transformers, and even lets us work with other languages that can be represented in ASTs. And if that’s not enough, the tool features a REPL for writing transformers that provides a super tight development loop for writing linting rules and code transformations. It is an invaluable tool.
The tool is initially split up into two frames: JavaScript code on the left and an AST representation of the same code on the right. This tree representation is expandable and collapsible and when clicking through nodes on the right, the corresponding code is highlighted on the left (and vice versa):

Note that for this example, we’re using the babylon6 parser, although a number of the parsers follow the same pattern. When traversing through nodes, you’ll notice common properties on each node:
- Start and end property – if the JavaScript code were a flat, one line string, these numbers represent the start and end position in that string
- Loc – location properties of the node where each property has a line and column number
- This is a more descriptive property of where in the actual code the node resides
- Type – for AST manipulation purposes, this is the most important property as it denotes the type of AST node the code represents. As we’ll see later in this post, these types are referred to directly for manipulating code. There are a lot of these node types.
In addition to these base properties, you’ll notice other various properties specific to each node type. The beauty of viewing code like this is the insight you get into the language. For example:
- A variable assignment is made up of a VariableDeclaration, which itself has an array of VariableDeclarators. This construct is what allows us to assign multiple variables with only one assignment type keyword (e.g. var)
- A basic If statement is composed of a “test” (the boolean check after the if statement), a “consequent” (the “truthy” block) and an optional “alternate” (the “falsey” block)
- There are three function types: FunctionExpression, ArrowFunctionExpression, and FunctionDeclaration.
While the above examples might not be mind blowing, viewing JavaScript code in a tree format gives the developer a different perspective on how the code is represented and interpreted by a runtime; it’s not just a text file. By becoming familiar with properties of certain language constructs, it can make you a better developer when debugging or writing code.
Analyzing and Manipulating ASTs
Viewing JavaScript code in a tree format is neat and interesting but manipulating code via ASTs is where the fun is at. The visitor pattern is often employed for analyzing and modifying tree structures. As Wikipedia articles are wont to be overly dry and complex, the visitor pattern as it applies to AST manipulation in JavaScript boils down to this:
- What node types do you want to visit?
- When you have a handle on a given node type, what work do you want to perform on that node?
To follow along with the examples below, go to ASTexplorer.net. Open up the transform window by clicking the “Transform” drop-down at top of page and selecting babelv6 parser. Let’s look at a function that is used by this parser:
module.exports = function arrowFuncParamConsole (babel) {
  const { types: t } = babel;
  return {
    name:'ast-transform',
    visitor: {
      ArrowFunctionExpression(path) {
        //grab actual node
        var node = path.node;
        //get number of params that function accepts
        var paramCount = node.params.length;
        //and log
        console.log(paramCount)
      }
    }
  };
}
The code above looks for all ArrowFunctionExpressionsand logs out the number of arguments that function accepts.
But this is no fun, we want to actually change code! The following snippet looks for all variable declarators that are snake_cased and renames them to be pascalCase:
function isSnake(idNode) {
 return idNode.name.indexOf('_') > -1
}
function toTitleCase(str) {
 var [first, ...rest] = str;
 return `${first.toUpperCase()}${rest.join('')}`
}

module.exports = function snakeToPascal(babel) {
 const { types: t } = babel;
 return {
   visitor: {
     VariableDeclarator(path) {
       var node = path.node;
       if (!isSnake(node.id)) {
         //common pattern to bail early
         return
       }
       var [first, ...others] = node.id.name.toLowerCase().split('_');
       var mapped = others.map(name => toTitleCase(name))
       var pascalName = [first, ...mapped].join('')
       node.id.name = pascalName
     }
   }
 };
}
And finally, not only can we update existing code, we can add code to existing code! This last example inserts stopwatch functionality around all invoked functions named expensiveOperation :
module.exports = function expensiveOperationLogging(babel) {
  function createInstant() {
    //create console.log(Date.now) statement nodes
  }

  function createConsole() {
    //create console.log statement nodes
  }
  var { types: t} = babel;
  return {
    name: 'expensive-operation-logging',
    visitor: {
      CallExpression(path) {
        if (!t.isMemberExpression(path.node.callee) || path.node.callee.property.name !== 'expensiveOperation') {
          return
        }
//if callee's parent is "request"
        //and function is "expensiveOperation"
        //insert stopwatch code in front of and behind code
        var startDecl = createInstant('start');
        var endDecl = createInstant('end');

        //these calls insert expressions before and after the function call.
        path.insertBefore(startDecl)
        var durationExpression = t.binaryExpression(
          '-',
          t.identifier('end'),
          t.identifier('start')
        )
        var consoleStatement = createConsole(
          t.stringLiteral('expensiveOperation finished in: '),
          durationExpression
        )

        path.insertAfter(consoleStatement)
        path.insertAfter(endDecl)
      }
    }
  };
}
And not only can we manipulate code but we can also use ASTs to validate our code, looking for invalid patterns and ensuring that our codebase meets a certain level of quality. The code below checks to ensure that all functions (declarations and expressions) have at most six arguments:
const defaultParamMax = 6

module.exports = {
  create: function (context) {
    function restrictParams(node) {
      if(node.params.length > defaultParamMax) {
        context.report({
          node,
          message: `Function parameter length should not exceed ${defaultParamMax}`
        })
      }
    }
    return {
      FunctionDeclaration: restrictParams,
      FunctionExpression: restrictParams,
      ArrowFunctionExpression: restrictParams
    };
  }
}
The code for each of the examples above can be found in the fun-with-asts GitHub repo.
What you’ll notice about the above code snippets is that they are all approachable, readable code. This is because working with ASTs is no different than any other program you might write in JavaScript. Aside from knowing how to work with the Visitor pattern (and common pitfalls) working with ASTs is a straightforward endeavor. They’re just like any other JavaScript program.
While analyzing and manipulating ASTs might seem like a novelty and a neat way to think of code, you might be wondering how you would ever use this in your day to day. In other words, “when would I ever use this to solve an actual problem I face at my day job”. The answer to this question lies in what kind of problems you want to solve and what kind of tools you use on a daily basis.
Below we’ll look at two common use cases of AST manipulation: linting code via ESLint and code modification (codemods) using Babel. The purpose of each demonstration is not only to show you the value proposition of each tool but also the basics of writing a rule/plugin (using practical examples), how to write tests against this code, and run each tool locally.
ESLint
ESLint is a popular JavaScript linting tool that leverages ASTs to gain better insight into your code. By performing a static analysis of your code, an ESLint rule can emit an error message, notify the user of the piece of code where the violation is occurring, as well as fix the piece of code that is violating the linting rule.
The process by which an ESLint rule analyzes code is as follows:
- ESLint parser accepts source code and converts to AST
- An ESLint rule is applied to the AST. If the ESLint rule finds code that it deems invalid, the rule reports the violating code along with a message and the exact location that the violation is occurring.
- Optionally, if the violating code is automatically fixable, a function can be applied to the code to transform the AST. If a fix is performed, ESLint emits the new AST as source code which is then written to disk.
The power of ESLint and its use of ASTs to perform static analysis of your code comes from the ability to understand the context and scope of your code and not just surface level string patterns that regular expressions rely on.
For example, let’s say we would like a rule that prevents us from writing code in which we have variable shadowing. To accomplish this, we need to know the lexical scope in which a variable is declared as well as its scope chain to see if the same identifier exists. This type of analysis would be very hard or impossible using a regular expression-based linter. In fact, ESLint offers a variable shadowing rule out of the box.
Writing an ESLint Rule
Writing an ESLint rule is a straightforward process thanks to AST Explorer:
- Create a new snippet in AST Explorer
- In the transform drop-down, select eslint v3
- Start writing your ESLint rule in the bottom left corner
- Enter invalid code in the editor pane
- Any ESLint errors will display in the bottom right
With ESLint, context.report is used to notify the runtime of the violating piece of code (i.e. node) as well as a message that is displayed above said code.
As a practical example, let’s say that you are writing an Angular 1.x application. As a team, you and your teammates have decided that you do not want your code to use data binding via the $scope service and that the bindToController pattern is preferred.
To achieve this, we’ll need to guard against $scope being injected as a parameter to the Angular controller. Remember that Angular DI is string based so we’ll need to accommodate for the following scenarios:
- When the variable
$scopeis declared as a parameter for an Angular controller - In the situation where the property
$injectis assigned to the controller, we want to check if the string literal“$scope”is a value of the assigned array
Let’s look at how we can perform this analysis using ASTs and ESLint:
const message = 'Do not use $scope'
module.exports = {
  meta: {
    docs: {
      description: 'disallow $scope from being used in angular ctrls. prefer bindToController',
      category: 'Angular best practices',
      recommended: true
    }
  },
  create: function noScopeRuleImpl(context) {
    return {
      FunctionDeclaration(node) {
        const scopeParam = getScopeParamFromFunction(node);
        if (scopeParam) {
          context.report({
            node: scopeParam,
            message
          });
        }
      },
      AssignmentExpression(node) {
        const scopeParam = getScopeParamFromInject(node);
        if (scopeParam) {
          context.report({
            node: scopeParam,
            message
          });
        }
      }
    };
  }
}
Here’s this rule in ASTExplorer and the full code can be found here. Note how this entire rule can be written using AST Explorer as a REPL. This is great for basic prototyping and having a tight feedback loop when writing our rule.
Next, let’s look at how we can test our rule for correctness, as well as ensuring that the rule actually validates real code.
Testing an ESLint Rule and Incorporating a Local Rule
Testing an ESLint rule is incredibly easy. ESLint as a library provides a testing tool that is as simple as:
- Providing the ESLint you want to test
- An array of code snippets that do not result in errors
- An array of code snippets that DO result in errors
You can use most testing frameworks to run these tests, though I prefer Facebook’s Jest:
const { RuleTester } = require('eslint')
const noScopeRule = require('./no-scope')
const ruleTester = new RuleTester();
const validCtrlWithParam = `
  function myCtrl(myService, myScope, somethingElse){
  }
`
const directiveLink = `
  function myDirective() {
    return {
      link: function($scope) {
    }
  }
}
`
const invalidCtrlWithParam = `
  function myCtrl(myService, $scope) {
  }
`
const invalidCtrlWithInject = `
  myCtrl.$inject = ['anotherService', '$scope']

  function myCtrl(anotherService, scope) {
  }
`
ruleTester.run('no-scope', noScopeRule, {
  valid: [
    validCtrlWithParam,
    directiveLink
  ],
  invalid: [
    invalid(invalidCtrlWithParam),
    invalid(invalidCtrlWithInject)
  ]
})
function invalid(code) {
  return {
    code,
    errors: [{
      message: 'Do not use $scope'
    }]
  }
}
See here for more information on testing an ESLint rule.
Finally, to see our ESLint rule in action, we’ll utilize the npm module eslint-plugin-local-rules and in our ESLint config and register angular-no-scopeas a rule for ESLint to run against our code:
module.exports = {
  "env": {
    "browser": true,
    "commonjs": true,
    "es6": true,
    "node": true
  },
  "plugins": [
    //registers this npm package as plugin
    "eslint-plugin-local-rules"
  ],
  "rules": {
    //using eslint-plugin-local-rules plugin, we tell
    //eslint to use our local-rule.
    "local-rules/angular-no-scope": 2,
  }
};
Now, when we run our linting task against our source code, we’ll see two errors printed to the console, notifying us that we have code that’s in violation of our team’s code convention:
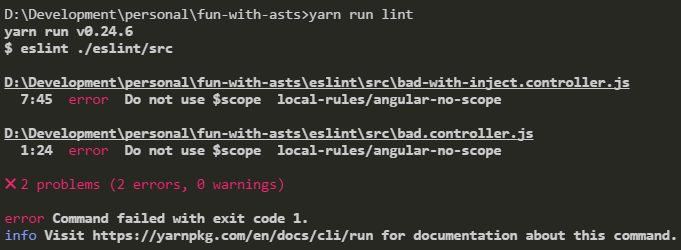
This code is now ready to be shared with all members of the team to ensure a consistent and team compliant codebase.
Code Transformation Using Babel
Babel is a code transformation tool that has changed how developers write JavaScript applications. Through the use of analysis and manipulation of ASTs, Babel allows one to write code transformations (“plugins” in Babel lingo) to perform actions as basic as variable renaming to as complex as converting future spec compliant JavaScript to code that can run in modern and legacy browsers.
Babel performs the following work to transform your code:
- The source file is converted to an AST
- Babel applies the AST to the provided plugin(s) which manipulates and emits a new AST
- This new AST is converted back into source code and written to disk
Babel accepts an array of plugins to apply to your source code, forming a file processing pipeline where the output of one plugin is provided to the next plugin as its input. The output of this process is then written to disk as transformed code.
Writing a Babel Plugin
Much like writing an ESLint rule, writing a Babel plugin starts with AST Explorer:
- Select
babelv6from the transform menu - Write your plugin in the bottom left pane
- Input code in the top left pane
- Processed code will appear in the bottom right pane
To transform code, Babel allows for the developer to (among other things) append to, prepend to, or completely replace the node representation of the JavaScript code. Conversely, if the code being analyzed does not match the pattern the plugin is looking for, your Visitor function can simply return and your plugin will not perform any transformation, though Babel will still emit files to disk.
Let’s look at a common problem that we as developers face when writing code that is to be used by multiple developers throughout a codebase. In our hypothetical, let’s say that our team has written a function called importantFunc that accepts multiple arguments. This function is critical to our project and is already used in multiple locations, however, the team has determined that it’ll be more maintainable to change the function signature to accept a single object instead of relying on the client code to provide the values in an ordinal fashion.
To accomplish this using a plugin, we will:
- Look for all instances where the function
importantFuncis being called - Convert the existing identifiers or values that are being provided as ordinal arguments into an object
- Replace the multiple arguments in the source code with this single object
Here’s the code to accomplish this:
module.exports = function funcApiChange(babel) {
  const { types: t } = babel;
  //ordinal to name mapping
  const ordinalMapping = {
    0: 'name',
    1: 'age',
    2: 'location'
  }
  const convertOrdinalToObject = (params) => {
    const objectProperties = params.map((p, idx) => {
      const key = ordinalMapping[idx];
      return t.objectProperty(t.identifier(key), p)
    })
    return t.objectExpression(objectProperties)
  }
  return {
    name: 'func-api-change', // not required
    visitor: {
      CallExpression(path) {
        if (path.node.callee.name !== 'importantFunc') {
          return
        }
        const objectExpression = convertOrdinalToObject(path.node.arguments)
        path.node.arguments = [objectExpression]
      }
    }
  };
}
The full source code can be found here.
Testing a Babel Plugin
Before we run the plugin against our source code, we’d like to test for correctness. To do this, we’ll leverage babel-plugin-tester, which allows us to use our testing framework of choice (though Jest is the favored framework) and provides the ability to pass in plugin options, as well as snapshot testing of our emitted code.
Testing is relatively straightforward. Simply import the plugin that you would like to test and write tests by specifying situations where the plugin should and shouldn’t transform the code. For instances where the plugin does apply, you then provide an output value that represents the generated code. babel-plugin-tester then runs the source code through the plugin and compares the source to the provided output string.
babel-plugin-testers’ function pluginTester takes at minimum two properties: our plugin and a testsobject that contains our test scenarios. The keys in this object are our test cases and the value is either a string (which represents the test case’s source code) or an object.
Below is a test for our func-api-change plugin. The first test case is code that should not be run through our plugin. In this test case, simply providing the source code as the value of this property tells pluginTester that this code should not change. Any emitted code as a result of this test case will result in a failed test. The second and third properties are scenarios where the source code should be transformed by our plugin. In each of these objects, the source code is provided via the code property and the expected output is represented via the output property. Any deviation between the actual output and expected output will result in a failed test.
const plugin = require('./func-api-change')
const pluginTester = require('babel-plugin-tester')

pluginTester({
plugin,
tests: {
'does not change non importantFunc invocations': 'someFunc(a, b, c);',
'changes importantFunc invocations from ordinal to object - params as references': {
code: 'importantFunc(a,b,c);',
output: `importantFunc({\n name: a,\n age: b,\n location: c\n});`
},
'changes importantFunc invocations from ordinal to object - params as literals': {
code: `importantFunc('mike', 32, 'mpls');`,
output: `importantFunc({\n name: 'mike',\n age: 32,\n location: 'mpls'\n});`
}
}
})
If you’re using Jest as your testing framework, babel-plugin-tester allows for snapshot testing. Snapshot testing is useful for scenarios where you’ve gotten your code to a stable and correct state and want to prevent against regressions while performing additional development. To enable snapshot testing for the example above, simply replace the output properties with snapshot: true.
Using Babel Plugins as a Codemod Tool
Now that we have our plugin tested and are confident that it works, we’d like to put our plugin to use. While Babel plugins are usually used as part of a build pipeline (using webpack or the Babel CLI), for our use case we’d like to update our source code in place. To do this, we’re going to use our plugin as a codemod using the aptly named library babel-codemod.
Babel-codemod is a CLI tool that accepts a list of Babel plugins and a glob or file path to the source code we’d like to modify. In our repo, we have defined an npm script that runs this tool against our source code:
"scripts": {
  "babel:codemod": "codemod --plugin babel/func-api-change/func-api-change.js babel/func-api-change/src"
}
Running this script will apply our func-api-changeplugin against all files located in the directory babel/func-api-change/src, the result being these files being updated in place with our new function signature:
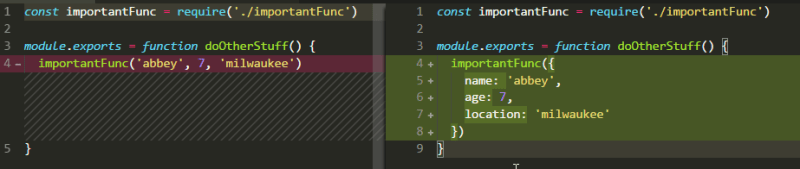
In this example, we only update a couple of files in the repo, however, this same approach can be applied to any codebase, allowing the developer to update hundreds of files with confidence.
Conclusion
The ability to analyze JavaScript code at the syntax level using Abstract Syntax Trees enables us to perform powerful tasks and create useful tools. By utilizing ASTs with ESLint, we can write linting rules that are specific to our business domain in an effort to keep shared codebases consistent and bug-free. When used as a codemod tool, ASTs and Babel plugins afford us the flexibility in changing APIs that are utilized throughout a codebase with supreme confidence. And the tools that are available to us make analyzing code via ASTs as straightforward as writing any other JavaScript program. But possibly the most important feature of code analysis is that it allows us better introspection into the language that we know and love and use every day to build great applications.

Leave a Comment