Major thanks to the MacLexa project out on Github for providing motivation, source code, and a great starting place for this blog post.

Amazon Echo is an always listening device which acts as an always available assistant. Thanks to the deep integrations that the Amazon Echo has to online services you can issue a wide variety of questions and commands via voice and get real world responses.
Once your Amazon Echo is setup it is always listening for commands. The key word being listened for is “Alexa”. For example: “Alexa, play Taylor Swift.” If you have an Amazon Music account, and you have purchased Taylor Swift songs (who doesn’t have the 1989 album by this point?), then your Amazon Echo will start playing Taylor Swift.
Notice that I used “Alexa” as a prefix in the above audio command. Saying “Alexa” to an Amazon Echo is the trigger word. It is like saying “Hey Siri” to your iPhone, “OK, Google” to your Android Phone, or “Xbox” to your Xbox, then issuing a voice command. Once you have spoken “Alexa” the Amazon Echo device will record the rest of your voice command and relay it to Amazon’s Alexa Voice Service which will take specific actions and return a response from Amazon.
The Alexa Voice Service has another trick up its sleeve: Skills. Third-parties can create a Skill using Amazon’s Alexa Skills Kit which can extend the Alexa Voice Service via additional service integrations.
- Fidelity has created a stock value skill that allows you to get answers to questions about values on the stock market. Once you have activated the Fidelity stock skill for your Amazon login via an Android or iOS app, then you can ask Alexa: “What is the value of Microsoft stock?” and get back an answer via the Fidelity stock skill.
- There is a skill called Yonomi that integrates with Phillips Hue lightbulbs. It allows you to change the color of your lights with a voice command, so you could flood the room with red light whenever you say: “Alexa, set lights to ‘Game of Thrones’ mode.”
- Of course, you can also buy stuff from Amazon. Just say: “Alexa, buy me some Moon Cheese” If you are an Amazon Prime subscriber, and you have already ordered Moon Cheese, it will be ordered automatically and FedEx will deliver it to your doorstep in 2 days or less (or the same day if you have Amazon Prime Now).
- If you have a Spotify subscription, you can configure Alexa to integrate with the Spotify Skill and issue voice commands to playback all the music you can stream from that service.
Let’s review all the terms in this Amazon voice control and audio device realm:
- Echo — The always-on, standalone device that listens and responds to voice commands.
- Alexa — The keyword that the Amazon Echo uses to determine when a voice command is being listened for. It is also the brand name for the back-end voice services.
- Alexa Voice Service — The backend service that receives voice commands and delivers audio responses to voice commands.
- Skill — A third party add-on to handle special voice commands.
- Alexa Skills Kit — The collection of APIs and resources developers use to create skills.
iOS App Integration of the Alexa Voice Service
The Amazon Echo is an interesting device, however, I have an iPhone that has a perfectly good microphone + speaker combination in it. Lets integrate Amazon’s Alexa Voice Service (AVS) directly within an iOS app.
Why would you want to do this kind of in-app Alexa Voice Service integration?
- It is just plain fun to see this actually work.
- It is an interesting in-iOS-app stop gap that addresses the limitations of SiriKit’s intent domains for your specific app type.
- Promote and do in-app integration of your own custom AVS Skill.
- Get insight into Amazon’s web API design methodology.
Side Note: Not to be underestimated is the amazing configurability that Cortana allows app developers for Windows 10 Universal Windows Platform apps. However, Cortana integration and LUIS are topics for a different Blog post.
Let’s go through the steps needed to perform AVS integration within your native iOS app.
If you have a Mac and want to try out Alexa Voice Services + Skills on your Mac right now check out MacLexa.
There is a 4 step in-app procedure to follow for integrating the Alexa Voice Service into your iOS application:
- Authorize the app via Login with Amazon and retrieve an Access Token.
- This requires a user account with Amazon.
- It is used to associate future Alexa Voice Service requests with the Alexa settings that any Amazon user has setup on their own personal Amazon account.
- This step also lets your in-app Alexa integration fully work with any Skills that are associated to an Alexa + Amazon account via Amazon’s Alexa configuration apps.
- Record audio from the device microphone and store it locally to your app.
- HTTP POST the Access Token and the audio from the device microphone to the Alexa Voice Service.
- Playback Alexa’s voice response audio which is returned raw from the Alexa Voice Service.

Sample Source Code
Feel free to pull from my AlexaVoiceIntegration Github repo for a full working sample. (Sorry, it is still in Swift 2.3)
The most fun chunk of code is the upload function which performs the upload to AVS and the playback of the Alexa voice response.
Registration of your Alexa Voice Service app integration with Amazon Developer Portal
In order for your app to integrate with Alexa Voice Services you need to go to the Amazon Developer Portal and get certain specific keys:
- Application Type ID
- Bundle Id
- API Key
- Sign up for a free Amazon developer account.
- Login to the Amazon Developer Portal.
- Select “Get Started” under Alexa Voice Service and follow the instructions to register your product.
The end goal for the in-app Alexa startup procedure is to get an access token string that we can send via HTTP to the Alexa Voice Service API.
We get the access token by using the LoginWithAmazon.framework for iOS feeding in the Application Type ID, Bundle Id, and API Key values you will configure and generate on the Amazon Developer Portal.
From your Amazon Developer Portal / Alexa configuration you need the following values:
- Application Type ID from your created Alexa Application / Application Type Info section
- API Key and Bundle Id pair that you will create in the Alexa Application / Security Profile / iOS Settings area
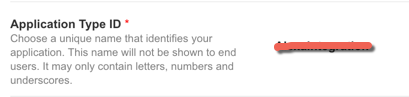

Be sure to keep track of the Application Type ID, API Key, and Bundle Id. We are going to need these later on when we setup our iOS app.
iOS code and Xcode project setup to use the LoginWithAmazon.framework from Swift
Start by going through Amazon’s documented steps to get the LoginWithAmazon.framework file.
What follows is a fairly standard way of using a standard iOS framework within an existing Xcode project.
Copy the LoginWithAmazon.framework file to a folder within your iOS Xcode project.
Open Xcode and go to your iOS project General settings:
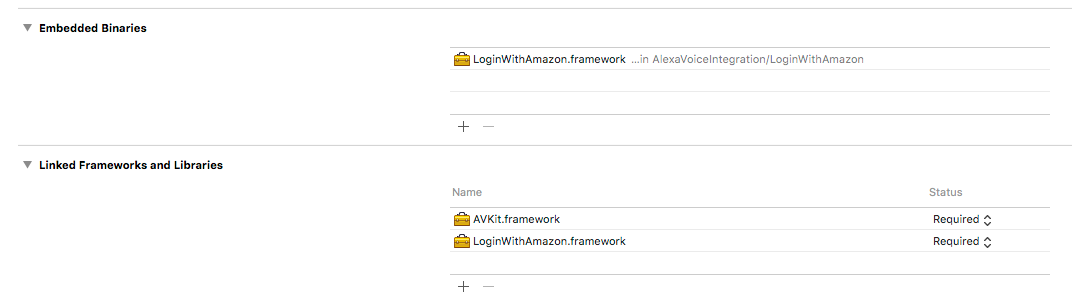
In the Embedded Binaries section press the + button.
Navigate the file chooser to where you copied the LoginWithAmazon.framework bundle. Press OK.
You should see something like the above where the LoginWithAmazon.framework file is in the Embedded Binaries and Linked Frameworks and Libraries section.
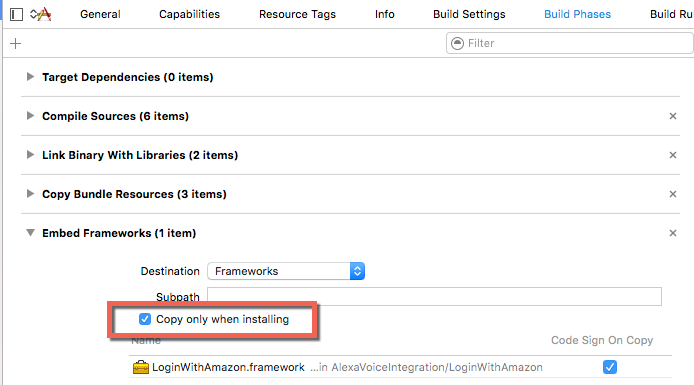
To fix an app deployment bug with the framework go to the Build Phases section and ensure that the Copy only when installing checkbox is checked:
The final step is to ensure that the master header from the LoginWithAmazon.framework is included in your Objective-C to Swift bridge header file.
If you already have an Objective-C to Swift bridge header file, then include the following line:
#import “LoginWithAmazon/LoginWithAmazon.h”
If you do not have a bridge header file, then you need to configure your Xcode project with an Objective-C to Swift bridge header, then include the above line in it.
See also the official Swift and Objective-C in the Same Project documentation provided by Apple.
Test to see if all this worked:
- Get a clean build of your app.
- Go into a Swift source file and use the standard auto-complete to try and access the AIMobileLib static class.
- The auto-complete should present the list of functions you can call.
Configure your app with the API Key, Bundle Id, and Application Type ID from the Amazon Developer Portal
First up is to ensure that Bundle Id, API Key, and other values are properly configured in your Info.plist and application.
Open up your app’s Info.plist within Xcode:
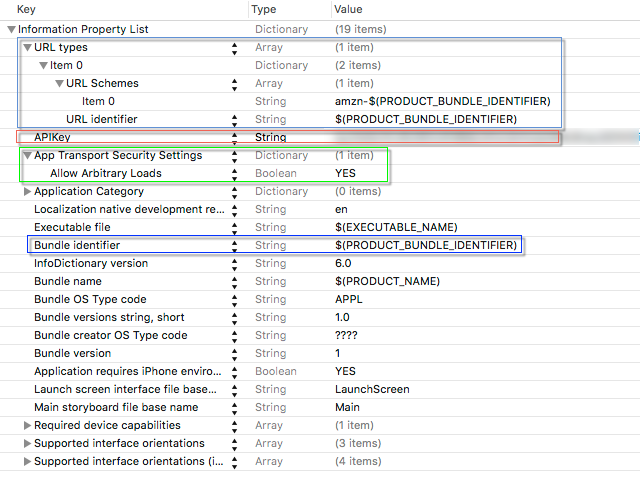
Bundle identifier
Whoa, that’s a lot of weirdness with $(…) stuff.
As you can see the core of our needed Login With Amazon values is the value of $(PRODUCT_BUNDLE_IDENTIFIER).
The value for $(PRODUCT_BUNDLE_IDENTIFIER) comes from your General project setting page within Xcode:

The above value in the Bundle Identifier field has to match the Bundle Id value from the Amazon Developer Portal.
If the Bundle Ids don’t match, then it is easy to go back to the Amazon Developer Portal and add a new value. Just be sure to track the right API Key and Application Type Id with the updated Bundle Id.
URL Types in Info.plist
The LoginWithAmazon.framework file uses an in-app UIWebView to handle user login scenarios.
Part of those login scenarios involve the UIWebView needing to navigate or redirect to a URL on login success / failure scenarios.
The redirect URL used is generated by the LoginWithAmazon.framework using your Bundle Id as a seed.
When the login result redirect happens within the UIWebView during login the main AppDelegate – openURL function is called in your app.
This boilerplate Swift implementation ensures that openURL portion of the login procedure properly routes through the LoginWithAmazon.framework file to call back on all the properly setup delegates:
 func application(application: UIApplication, openURL url: NSURL, sourceApplication: String?, annotation: AnyObject) -> Bool
{
   return AIMobileLib.handleOpenURL(url, sourceApplication: sourceApplication)
}
Debugging Tip: If you place a breakpoint on the above function and it is never hit during the login procedure, then you have a misconfigured Info.plist –> URL Types area.
App Transport Security Settings
The settings shown above are the most liberal and allow all HTTP traffic from within the process to be sent. To really lock this down, you should follow Amazon’s instructions which only allow requests to be sent from your app to specific Amazon domains.
API Key
The API Key entry within the Info.plist is read up and processed by the LoginWithAmazon.framework to get all the right IDs for all the requests (i.e. Client ID, and others). The API Key has to 100% match what the Amazon Developer Portal provided. It will be a fairly huge blob of text, and that is OK.
Config is now done! Woo hoo! Let’s login with AIMobileLib
ViewController.swift up on my Github repo shows how login will all come together.
The AIMobileLib is your static gateway provided by the LoginWithAmazon.framework.
Side note: I have ‘Swiftified’ my calls into LoginWithAmazon.framework by using an AIAuthenticationEventHandler wrapper class that implements the AIAuthenticationDelegate and bridges the delegate calls to closures.
The call chain to AIMobileLib to successfully login to Amazon:
- clearAuthorizationState – Clear out any stored tokens and values.
- authorizeUserForScopes – Pops a web view, user logs in, retrieves an authorization token.
- getAccessTokenForScopes – Takes all the cookies and keychain stored values from authorizeUserForScopes and retrieves the access token.
- We then use the access token in calls to the Alexa Voice Service.
- getAccessTokenForScopes – Takes all the cookies and keychain stored values from authorizeUserForScopes and retrieves the access token.
- authorizeUserForScopes – Pops a web view, user logs in, retrieves an authorization token.
In this sample I chose to clear out any stored tokens and values by using the clearAuthorizationState function on every run.
AIMobileLib.clearAuthorizationState(AIAuthenticationEventHandler(
            name: "Clear Or Logout",
            fail: {() -> Void in
                NSLog("Clear Or Logout Fail")
            },
            success: {(result : APIResult!) -> Void in
                NSLog("Clear Or Logout Success")
        }));
Now that all tokens / cookies have been cleared, let’s have the user login via authorizeUserForScopes.
Finally, we are at the location where we need to use that Application Type Id from the Amazon Developer Portal.
We need to feed in the Application Type Id from the Amazon Developer Portal into the option scope JSON:
 let options = [kAIOptionScopeData: "{\"alexa:all\":{\"productID\":\"Application Product Id\",
 \"productInstanceAttributes\": {\"deviceSerialNumber\":\"1234567890\"}}}"]
Note: kAIOptionScopeData key value comes from the LoginWithAmazon.framework headers.
When authorizeUserForScopes is successful we then turn around and call the getAccessTokenForScopes function.
When getAccessTokenForScopes is successful we now have the access token string we can use in pure calls to the Alexa Voice Service.
We have the access token! Let’s call into that Alexa Voice Service.
The Alexa Voice Service makes sending voice commands, and receiving voice responses, a very straight forward process:
- Record the user’s question as sound data from the microphone as PCM data.
- Send an HTTP POST request to the Alexa Voice Service that contains the sound data.
- In the response to the HTTP POST will be the sound data to playback to the user which answers their question.
The Alexa Voice Service calls are all handled within the AVSUploader class.
- startUpload – The master function that manages the upload process. Takes in completion handlers for success / failure.
- start – Just a general internal helper function, checks parameters and other cleanup.
- postRecording – Manages an HTTP POST operation to the Alexa Voice Service using the access token, some boilerplate JSON, and the raw PCM data recorded from the device microphone.
- When postRecording is successful, the completion handler fed into startUpload will be called.
- A parameter to the success completion handler is the raw PCM sound data (in the form of NSData) from the Alexa Voice Service that contains the voice response for the recorded user command.
- start – Just a general internal helper function, checks parameters and other cleanup.
The PCM sound data returned from the Alexa Voice Service can then be played through an AVAudioPlayer (From ViewController.swift):
self.player = try AVAudioPlayer(data: audioData)
self.player?.play()
Go out and play… and also take a look at making your own Skill
The sample Swift code to access the Alexa Voice Services is just meant to get you started. It allows you to have some level of control in how Alexa Voice Services are accessed and used within your own app. It can also be used to test any Skills you choose to integrate with your Amazon profile without needing an Amazon Echo device.
The techniques outlined above can also be fully replicated for any other other native device, platform, or front end.

Are you suggesting this technique as a viable option for voice enabling your professional iOS apps ? Isn’t the uploading and downloading of audio files a time consuming process ?
Can u post iOS sample code of Alexa vOICE SERVICE API IN OBJECTIVE C
U should just learn swift its time